Ionic 2 Environment Variables: The Best Way
Need to hit different urls in production than in dev? It only takes a couple small tweaks to make that happen, and once it’s in place swapping variables is as simple as setting Ionic’s –prod flag, or setting NODE_ENV instead if you need lots of environments!
Tweak Ionic’s Webpack
We need exposure to Ionics environment in our code, but the default Webpack config doesn’t allow this. So we are going to copy Ionic’s webpack config and add just one line to it. Copy webpack.config.js from node_modules/@ionic/app-scripts/config into your app’s root folder. We’ll use Webpack’s built in EnvironmentPlugin to expose Ionic’s IONIC_ENV environment variable to our code. Add the plugin to the plugins section in webpack.config.js (line 35):
plugins: [
  ionicWebpackFactory.getIonicEnvironmentPlugin(),
  new webpack.EnvironmentPlugin(['IONIC_ENV'])
],
Now we need to tell Ionic to use our Webpack config instead of it’s own, so add a config section to your project’s package.json like so:
"config": {
  "ionic_webpack": "./webpack.config.js"
},
Create Environment Variables Module
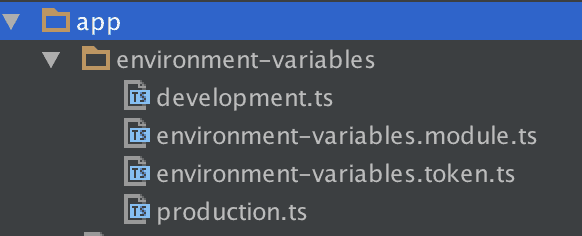
Now let’s create a new module to handle our environment variables. With a modular design we can easily reuse this feature in all our Angular 2 and Ionic 2 apps. Create a new folder in the app/ folder named environment-variables/, and within that create a module file, a token file, and two environment files:
First let’s look at environment-variables.token.ts, it just declares a new Opaque Token that we’ll use to inject our environment variables. For more info on Opaque Tokens see the docs or this excellent blog post.
import { OpaqueToken } from "@angular/core";

export let EnvVariables = new OpaqueToken("env.variables");
Now let’s fill in our environment variables, you can put anything you want, for this example I have:
development.ts
export const devVariables = {
  apiEndpoint: 'https://dev-endpoint.com',
  environmentName: 'Development Environment',
  ionicEnvName: 'dev'
};
production.ts
export const prodVariables = {
  apiEndpoint: 'https://prod-endpoint.com',
  environmentName: 'Production Environment',
  ionicEnvName: 'prod'
};
And finally the magic that ties all of this together, environment-variables.module.ts:
import { NgModule } from '@angular/core';
import { EnvVariables } from './environment-variables.token';
import { devVariables } from './development';
import { prodVariables } from './production';
import { qaVariables } from './qa';

declare const process: any; // Typescript compiler will complain without this

export function environmentFactory() {
  return process.env.IONIC_ENV === 'prod' ? prodVariables : devVariables;
}

@NgModule({
  providers: [
    {
      provide: EnvVariables,
      // useFactory instead of useValue so we can easily add more logic as needed.
      useFactory: environmentFactory
    }
  ]
})
export class EnvironmentsModule {}
Our module declares a provider with the token EnvVariables, but check out the value it uses. It checks if process.env.IONIC_ENV is equal to ‘prod’, and injects a different value based on the result. We can do this because we added ‘IONIC_ENV’ to Webpack’s EnvironmentPlugin.
You can now easily copy and paste this folder into any Ionic 2 or Angular 2 project and re-use it, but let’s test it out here first.
Test it out
First we have to import our new module into the app module:
imports: [
  IonicModule.forRoot(MyApp),
  EnvironmentsModule
],
Then, since I’m using the Ionic Blank Starter for this, I’ll go into home.ts and use my environment variables:
import { Component, Inject } from '@angular/core';
import { NavController } from 'ionic-angular';
import { EnvVariables } from '../../app/environment-variables/environment-variables.token';
@Component({
selector: 'page-home',
template: `
<ion-header>
<ion-navbar>
<ion-title>
Environment Variables
</ion-title>
</ion-navbar>
</ion-header>
<ion-content padding>
<ion-list>
<ion-item>
<h2>Ionic Environment</h2>
<p>{{envVariables.ionicEnvName}}</p>
</ion-item>
<ion-item>
<h2>Endpoint</h2>
<p>{{envVariables.apiEndpoint}}</p>
</ion-item>
<ion-item>
<h2>Environment Name</h2>
<p>{{envVariables.environmentName}}</p>
</ion-item>
</ion-list>
</ion-content>`
})
export class HomePage {
constructor(public navCtrl: NavController, @Inject(EnvVariables) public envVariables) {}
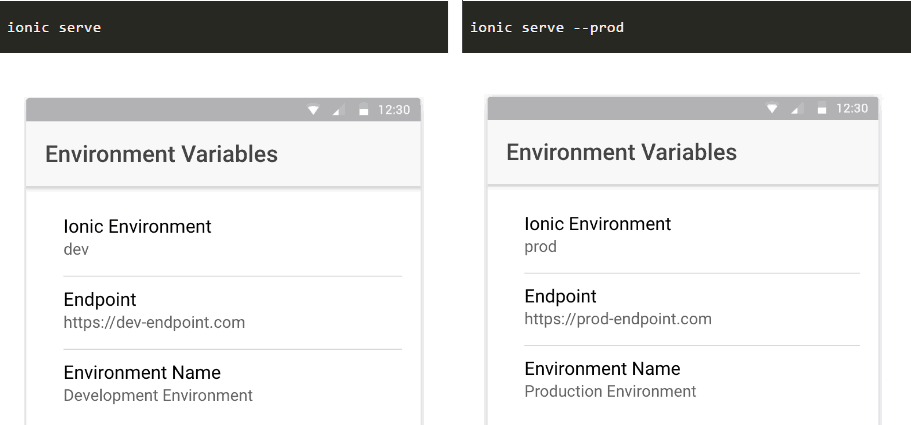
}The key line here of course is injecting the EnvVariables in the constructor. These will be either the production or development values depending on which Ionic environment I’m in. Let’s start Ionic and see.

Wrap Up
This could be refined or expanded on easily. While Ionic only supports two environments (“dev” and “prod”), you can use the EnvironmentPlugin to expose NODE_ENV instead of IONIC_ENV, and then set NODE_ENV to whatever you’d like. Don’t forget you can also setup npm scripts to set the NODE_ENV for you on run in package.json. Additionally creating an environment variables interface that each environment implements would ensure each environment used identical types. Try the demo out here: https://github.com/roblouie/ionic2-environment-variables
Thoughts? Ideas? Know how to improve upon this? Is this not truly the best way to get environment variables? Let me know in the comments below.